

Re-Leased is a cloud based commercial property management software that can integrate with Xero the online accounting solution.
 Commercial property management software is useful for businesses that own a shopping centre, and need to send out monthly invoices to tenants at the shopping centre. Tenancy at a shopping centre is typically associated with a lease agreement. The lease agreement has various legal stipulations associated with it;
- monthly invoicing,
- a set date for annual rent increases
- the rental increase % or CPI assigned
- a set date for market review
- a set date for a lease review
So invoices for tenants are all one big automated formula.
 About three years ago I was looking around at the options for managing tenant invoicing, and suitable packages started at about $20 000, SERIOUSLY! So I manually went through this laborious process of updating and invoicing.
Finally in 2011 Tom Wallace jumped into the Xero ecosystem world developing his product Re-Leased, which was launched at Xerocon in 2013. When Re-Leased first came out, I’d a long session with Tom to go through Re-Leased and its integration with Xero, and it met all of my client’s requirements and did everything I wanted in a retail property management solution.
Frankly what’s required in the commercial retail management industry is quite simple and automated, but massively time consuming if you’re doing it manually. Re-leased looks like it will save my client close to 10 administrative hours a month – that’s 120 hours a year or 3 weeks per year! We should have far more confidence in the accuracy of the records – as long as the lease information is entered correctly in the initial stages. Plus we’re able to maintain all business data (including scanned copies of the lease) in a single cloud environment so the implementation of Re-Leased means the client has a super-efficient and effective cloud based business management system – accessible anywhere in the world where internet access is available.
I worked on the Integration with Ramiz Gorgees, ex-Xero staff who now works with Re-Leased. He’s was super helpful setting up Re-Leased. I also worked with Jana Hood from across the pond, who has an in-depth knowledge of the solution and was on hand helping with fine tuning.
Here are a few of the features I like about Re-Leased the cloud based property management software ;
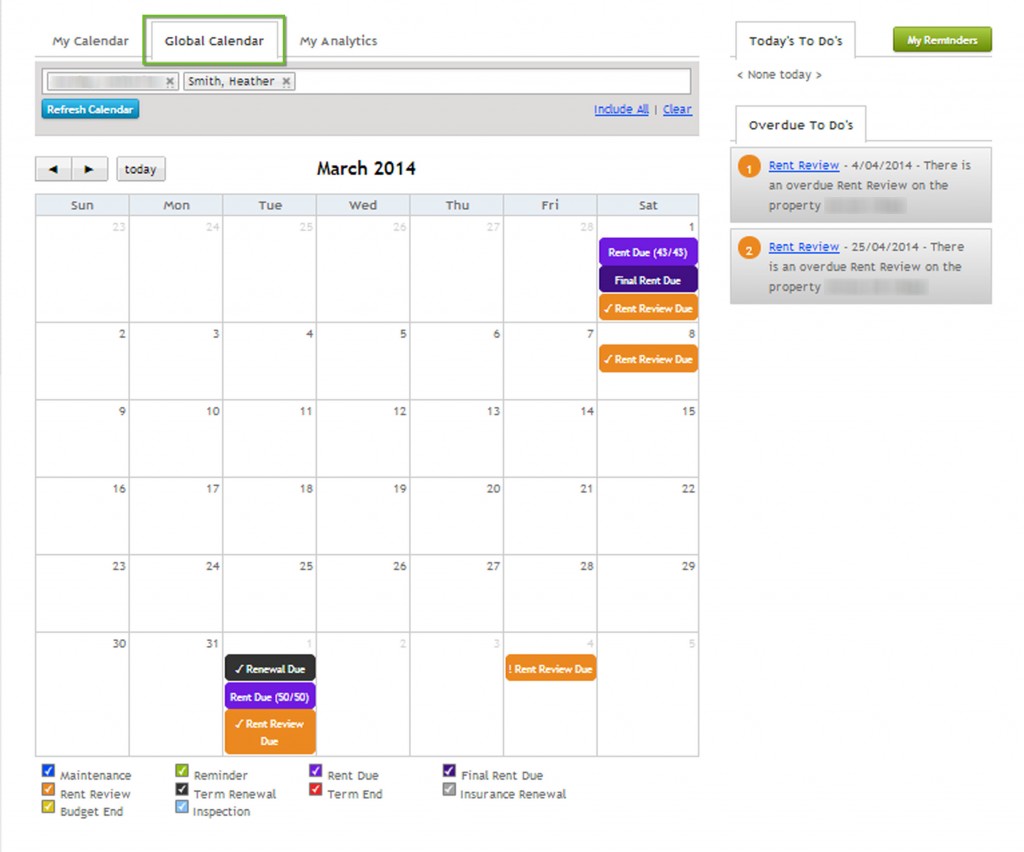
On the dashboard is a calendar. Events can be tagged to individual users (like a property manager) however when I access the system I can view all events of all of my clients properties under the global calendar tab. I can temporarily hide names, so I only view certain clients. There’s also a handy reminder list on the right side, to remind the property manager to conduct a Rent Reviews and other relevant tasks.
I love these visual dashboards cloud solutions are famous for. Click in and in 15 seconds you know what needs to be done, identify the tasks, review them and process them! It sounds really simple – and once its all set-up – it really is a relief not to be overwhelmed in laborious administrative tasks.
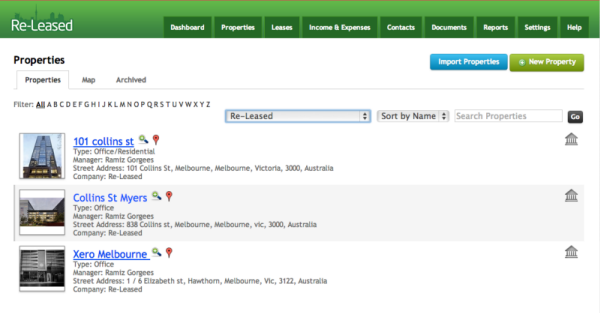
I love the fact ReLeased has the capacity to associate street front photos with all the commercial properties. This aids with quick recognition, especially with those tenancy’s they keep re-branding! The inclusion of visuals also aids those people who perhaps can feel like they are drowning in data, it can help them be more receptive to using Re-Leased.
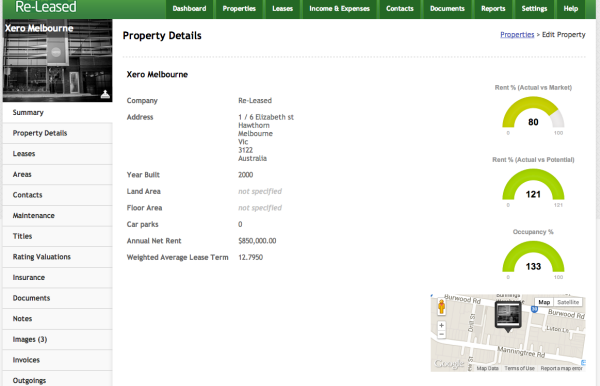
Click through to see further dashboard details of each individual tenancy, including occupancy percentage, land and floor area, annual net rent, all the data you need in an easy accessible dashboard. People love graphical representations!
Re-Leased enables the monitoring of profitability of each property, by syncing Tracking Categories between Re-Leased and Xero. Expenses can be entered in either Xero or Re-Leased, the ledger is updated in the background. Detailed Profit and Loss reports per Tracking group can be produced in Xero. Note: a single property can only be assigned a single Tracking group.
@re_leased One of the only @Xeroadd-on providers that I have seen use the tracking API perfectly!
— Scott Simenauer (@ssimenauer) April 1, 2014
Here are my notes from working on a Xero and Re-Leased integration – hopefully you’ll find them useful.
To SYNC Xero with Re-Leased
Set-up a Xero file, with an approved Chart of Accounts and Tracking categories per property group (or get me to do it!).
You can opt to set up the contact details in EITHER Xero or Re-Leased – don’t do it in both. If you set them up in Xero they are pulled across into Re-Leased, and vice versa.
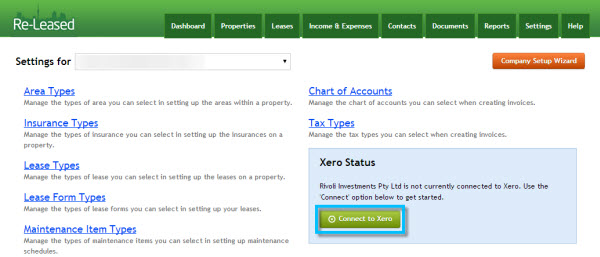
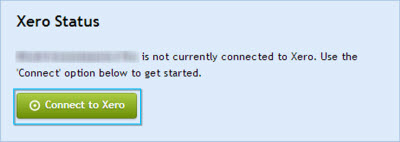
The first step of syncing your Xero and Re-Leased solutions starts in Re-Leased. Go to Settings (along the top dashboard) select the correct business (from the top left drop down menu) and click the green ‘Connect to Xero’ button on the right side.
 Reminder:
- The business and associated leases are set up in Re-Leased.
- The business and the chart of accounts, tax rates, contacts, and tracking categories are set up in Xero.
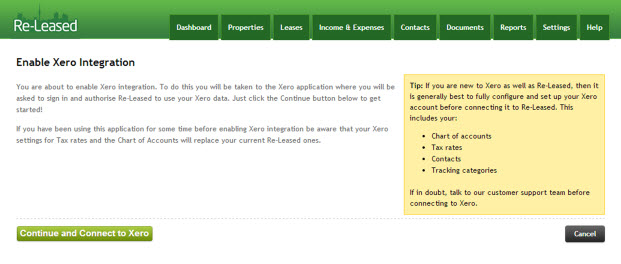
The next window appears entitled ‘Enable Xero Integration’. If you’re confident the information is correctly set up in Xero, enable the integration by clicking the green ‘Continue and Connect to Xero’ button on the bottom left of the screen.
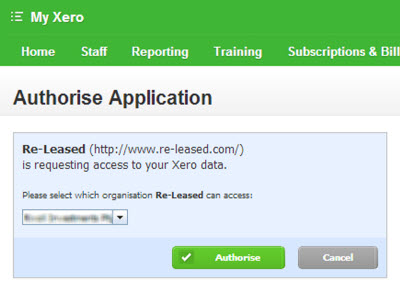
The next window, takes you out of Re-Leased across to the green My Xero area where you can authorise the application, Re-Leased can access your Xero data. Select the correct Xero file, and click the green Authorise button. In a few seconds the application is authorised and Re-Leased is enabled!
Decision time
The process takes you back to Re-Leased and you have the opportunity to set a date, where data will sync from. In my scenario, I chose to start one month earlier so I could run through all existing rent invoices, and match them to the previous system I’d been running.
Enter the date in the date calendar field and then click the green Save and Continue button. Be careful – it suggested a date in 2013 for me – don’t backdate it too much accidentally!
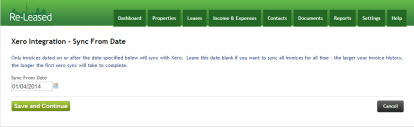
After syncing, data can be deleted afterwards if needed.
The next screen that appears is the Xero Integration – Tax Type Reconciliation window.
I ticked Yes, I understood there are 1 tax types in Re-Leased to be archived and then clicked the green Save and Continue button on the left.

The next screen that appears is the Xero Integration – Chart of Accounts Reconciliation window.
I ticked Yes, I understood there are 1 tax types in Re-Leased to be archived and then clicked the green Save and Continue button on the left.
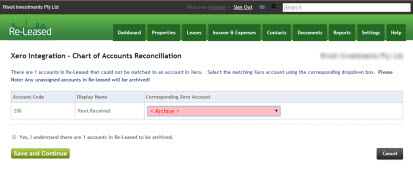
I’m not exactly sure what was happening here, the ‘archive’ account was set-up during the set-up process – however selecting it here is not going to be the default account in Xero.
Next you’re notified the systems are connected and the data is being pulled across into Xero. Click the green Continue button on the left.

Once completed, you pop back into Re-Leased at the Settings page. If there’s a lot of data to sync, you may notice a blue refresh symbol swirling around at the top of the screen – indicating the sync is in progress. Notice a pale blue box on the bottom right appears with the Xero status detailed.
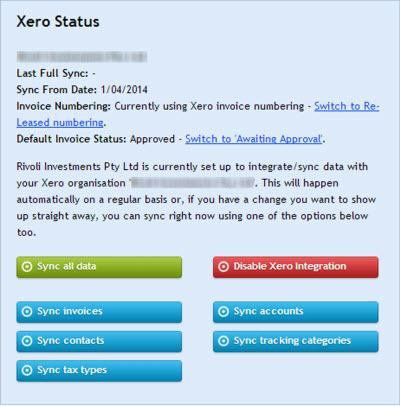
I opted to change the Default Invoice Status to ‘Awaiting Approved. At this stage I want to review and manually approve all Xero invoices – this may change in future. Manually approving invoices in Xero, only takes about 90 seconds. Manually viewing each individual invoice, before approving it will take considerably longer. During the implementation stage we went through every single invoice checking it meticulously. I suspect once the system is up and running – we’ll have confidence they’re generating correctly, and it will be a 90 second approval process….or we may even set them up as automatically approved – so generating invoices will take no time at all!
![]()
Re-leased and Xero files are now synced. Hurrah!
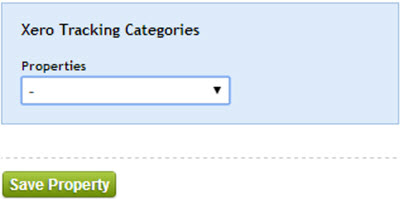
Defining the property Tracking Categories
From the Re-Leased dashboard click on Properties, select the relevant property, and then click Property Details – on the left bar the second option down. Scroll to the bottom of the page, and from the drop down menu select the relevant Xero Tracking Category. The Tracking Categories were pre-set up in Xero. Click the green ‘Save Property’ button.
Generating a Rental Invoice
The invoices create automatically – but for the initial set-up exercise I wanted to create them manually – to check they’re correct. I’ll be re-creating them for the previous month.
Setting the next invoice date in Xero
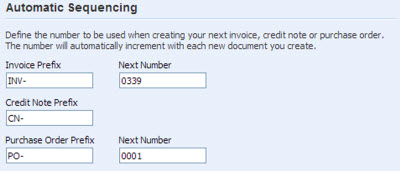
The next invoice number is generated from Xero. If you’re setting up a new Xero system, you’ll need to set the next invoice number. To set the next invoice number go to the Xero dashboard>Settings >General Settings>Invoice Settings and click the Default Settings button and enter the next invoice number in the Next Number field.
Checking the data entered in Re-Leased
Before creating the invoice, check the Lease Details of each property; From the Re-Leased dashboard click on Leases across the top bar, and select the property. Then and click on the left bar select Lease Details – the second option down. Make sure the Account name in Re-Leased matches the Contact name in Xero. Wishlist: Perhaps another field name or an explanation here that it needs to match Xero perfectly would be useful
Update if necessary and click the green Save button at the bottom of the screen.
Set up the OUTGOINGS in Re-Leased
There are shared expenses for tenants at shopping centres, such as rates, water and electricity, and they are allocated typically by area, to the individual tenants. However in a real scenario, a particular tenant, e.g. a Gardening business, may be allocated more of one expense than the other tenants.
I’m refer to these types of expense as OUTGOINGS, but you may have a different name for them.
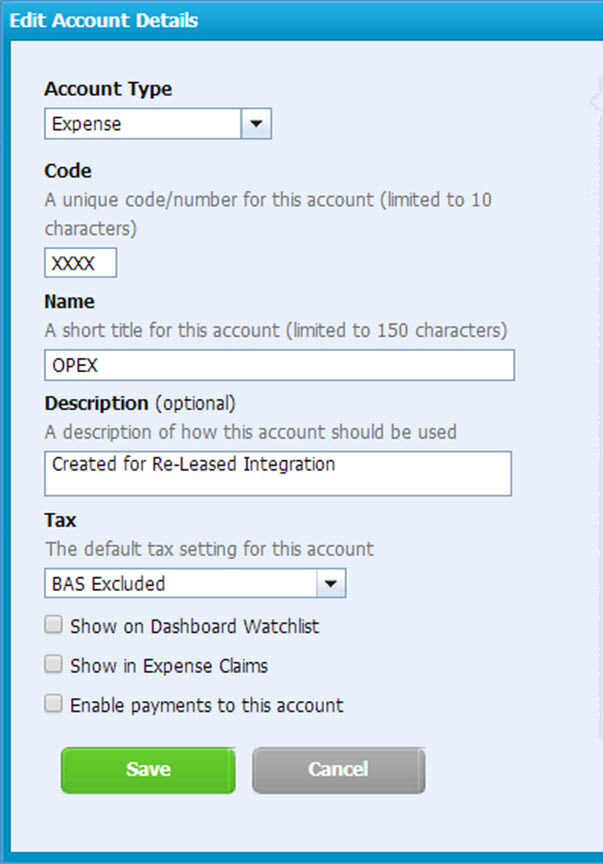
The first step in setting up the OUTGOINGS is to set up the systems to recognise a general ledger code for OUTGOING. To do this add the general ledger account XXXX-OPEX to the chart of accounts in the Xero file, and then re-sync the files will Re-Leased. If you have several businesses (or several Xero files) you need to sync Re-Leased for each file. I was setting up 3 Xero files, so did it three times.
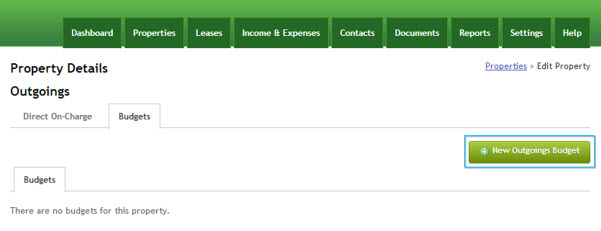
From the Re-Leased dashboard, select the Companies name then select the property, click on Outgoings at bottom left of the screen then click on the Budgets Tab. Click the green New Outgoings Budget button.
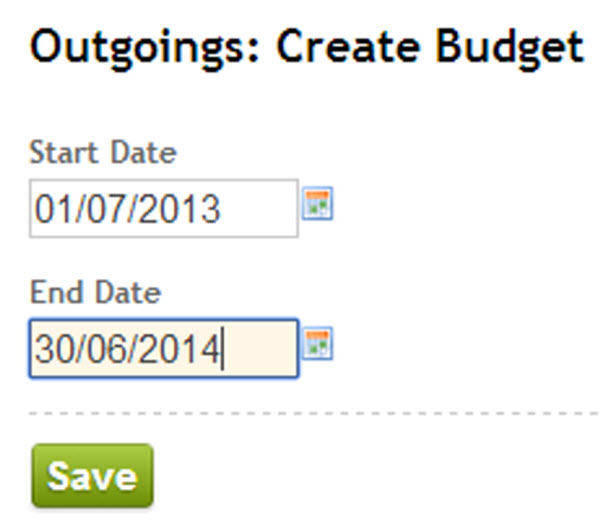
The next step is to define the period of the budget for outgoings. I opted for the financial year. Enter Start Date & End Date and click green save button at bottom of screen.
Click the green ‘New Allocation” button and the Outgoings: Create Budget Allocation window opens. You’ll notice, if outgoing percentages were entered, they’ve fed through to these fields. At the right field at the top right of the screen labelled Expense Account Type, select the account XXXX-OPEX.
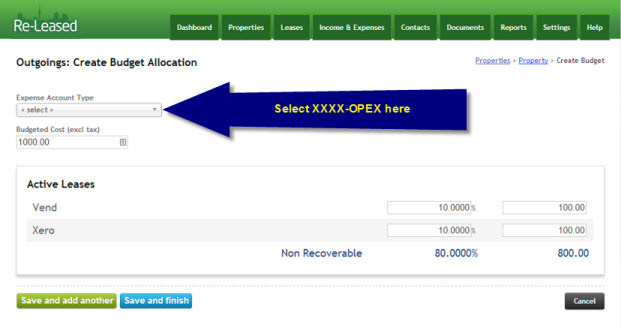
At the top right of the screen labelled Budget Cost (excl tax), enter the full year outgoings for the group of tenants excluding GST. Then individually allocate the full year outgoings, excluding GST for each tenant in the far column. This may change the percentages in the left column, but will not affect the percentages recorded elsewhere. Click the Save and finish button.
Then you’re taken to the screen Outgoings: Allocate to Rent. In this area the allocations to the outgoings transactions can be checked. The Properties tracking category has to be the same for tenants in a group of properties. When you’re satisfied with the data, click the green Save and Approve button at the bottom of the left of the screen.
Manually Generate Rent Invoices in Re-Leased
From the dashboard click on Leases select the property, and click on the left bar select Rent – the fifth option down. On the right is the blue Create New Invoice button.
The next screen is a confirmation screen, click the blue button ‘Yes, create next invoice’.
Click on Related invoices -> select the correct General Ledger account ->
Once satisfied with the invoice select the blue ‘Save & Submit for Approval’ button at the foot of the screen. Once this is done it should appear in Xero’s Sales Dashboard area, ready for Approval. You’d only do this if you are manually creating invoices – which should be rare – just at the start of the integration I hope!
Then sync Re-Leased by going to Settings and choose the option Sync all Data.
Note: While working with this program, I tried to work across multiple browsers – but it seem to cause the system to stall and at one stage it said ‘looking for socket’ so I’d recommend sticking with one tab open.
Invoicing with a Xero and Re-Leased Integration
Some further aspects of invoicing that may interest you are – the Xero invoice template is used, so the invoice branding inclusive of the business logo needs to be set up in Xero. The bulk of invoices are pushed across from Re-Leased. When an abnormal invoices arises the details can be entered in either system, and the journals will sync across the systems. I set up a branded invoice template and dragged it to the top of the Invoice settings dashboard, and it seemed to automatically be picked up in all the invoices generated.
How much time do I estimate Re-Leased will save my client?
As stated before monthly invoicing can be reduced to a completely automated process. Time still needs to be spent:
- pushing through any monthly rent reviews
- updating any contact detail changes
- Entering details from a new or revised lease is in place
As stated before Re-leased looks like it’ll save my client close to 120 administrative hours a year!
How much time should you budget for the implementation of Re-Leased
I never provide quotes for jobs, because something unexpected always crops up, and it would probably take less time to complete an integration, than to fully cost out and provide a definite cost of an integration. If you are just purely adding Re-Leased to your business, than I suggest a budget of 1.2 hour per lease reasonable. If Xero needs to be set up, that would be additional time. If your accounts need to be moved from another solution, again that is additional time. What also crops up during an integration and implementation, is you have the opportunity to examine current process, for example – the current chart of accounts used, and this adds to the time involved with the integration. This is good time for your business!! All this time spent on the integration – will save you time year after year.
What’s next
I’m going to use this blog post to share with you further learning’s about the integration as it progresses – so come back! Let me know if you have any questions. I’m now working on my forth Xero and Re-Leased integration – and I love seeing a solution massively improve the productivity of businesses. Let me know if I can assist you with your own integration.